

TutorialsWordPressAdvanced
How to set up OpenClaw for WordPress
Sep 15, 2026
By Larassatti D. & Simon L
/
6 min Read
Setting up OpenClaw for WordPress involves three main stages: deploying OpenClaw on a server, installing the WordPress skill, and authenticating it with your site. Once connected, OpenClaw can execute WordPress tasks autonomously through natural language
OpenClaw can run locally on your own machine or on a private server. This guide focuses on a server-based setup using a virtual private server (VPS), which is the more practical option for most users
Running OpenClaw on a VPS means it stays online around the clock, so it can execute scheduled tasks, respond to prompts, and complete background jobs even when your computer is off
Here’s how to set up OpenClaw for WordPress:
- Set up an OpenClaw instance on a VPS. Get the server running and connect it to an AI model.
- Install WordPress AI agent skills. Give your OpenClaw agent the knowledge it needs to interact with WordPress.
- Connect your WordPress site. Link your site to OpenClaw using authentication credentials.
- Start giving commands. Publish posts, manage content, and automate tasks right from the OpenClaw chat interface.
Continue reading for a guided walkthrough of all four stages
Before anything else, you’ll need a running OpenClaw instance that will connect to your site through the WordPress REST API. If you already have an active one running, you can jump right to the second step
We’re using Hostinger’s OpenClaw hosting to take advantage of its one-click installation template
With this plan, you’ll only need to choose any VPS plan you like, fill in your account details, complete the payment, and follow the onboarding steps until you see theOpenClaw configuration page
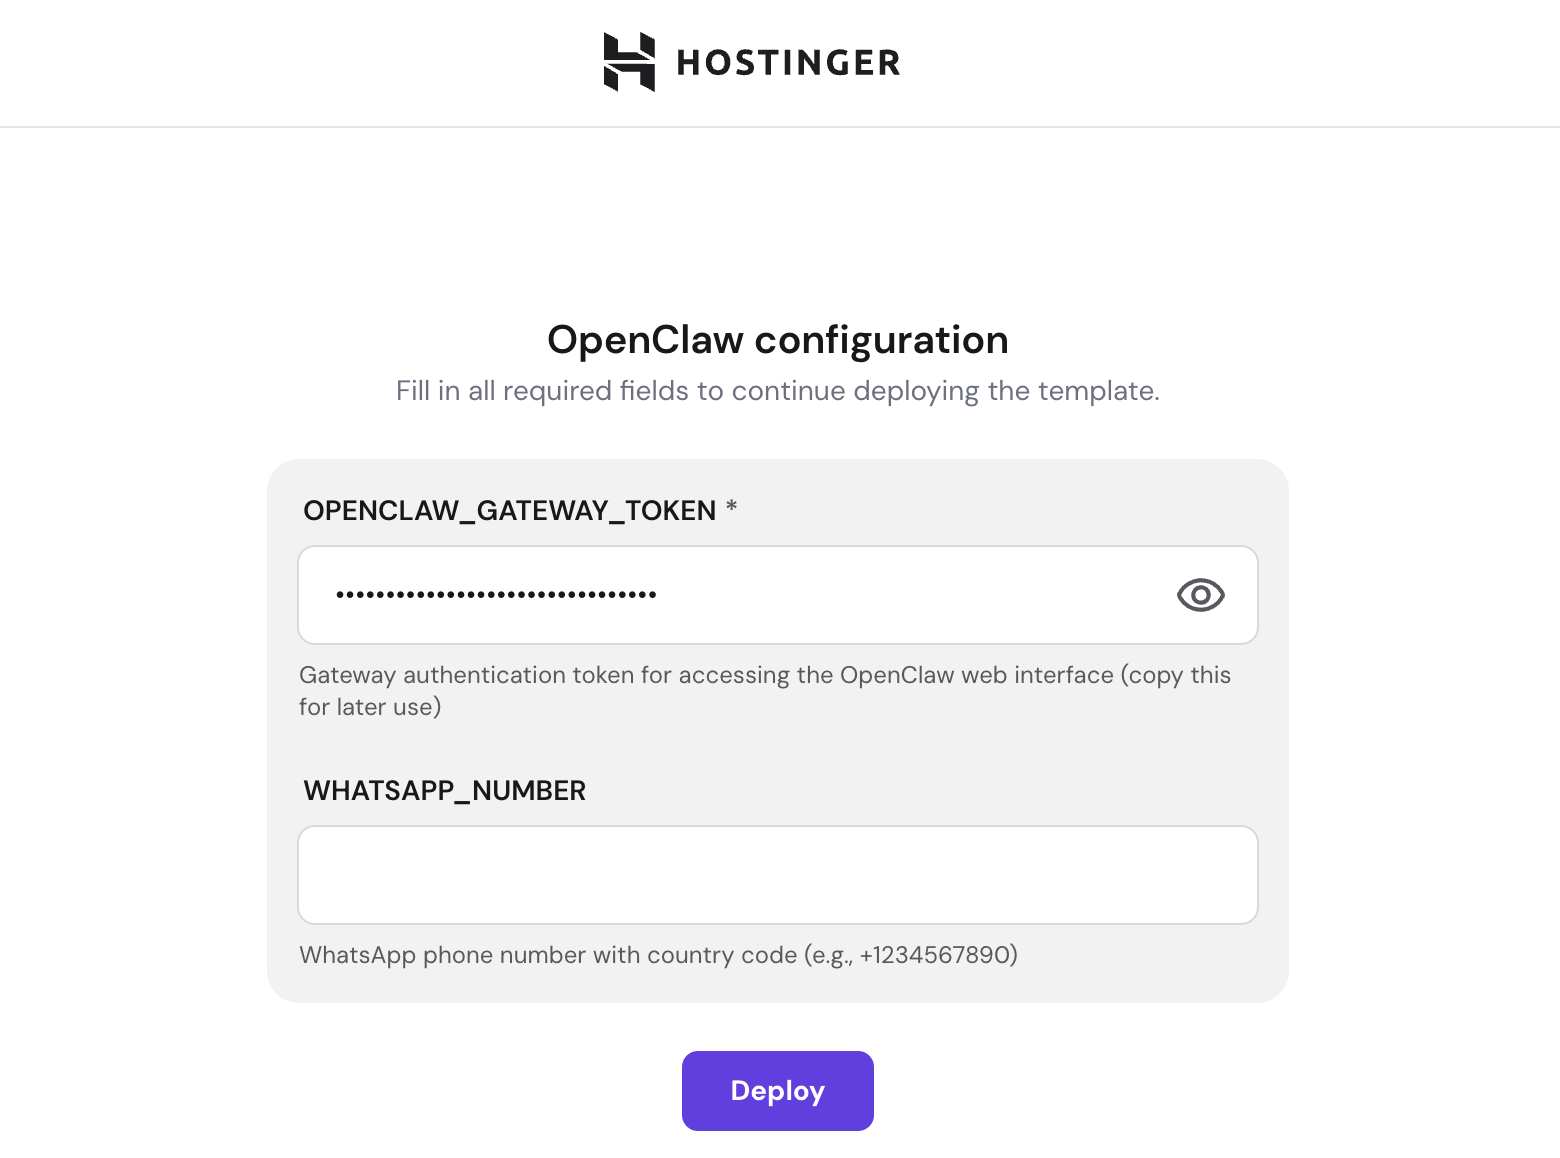
Add your WhatsApp number into the field, and keep the Gateway token somewhere safe. You’ll need it to log in to your OpenClaw dashboard
Once that’s done, click Deploy and wait until the installation is complete. The installation may take a few minutes; you’ll then be redirected to Hostinger dashboard’s VPS dashboard
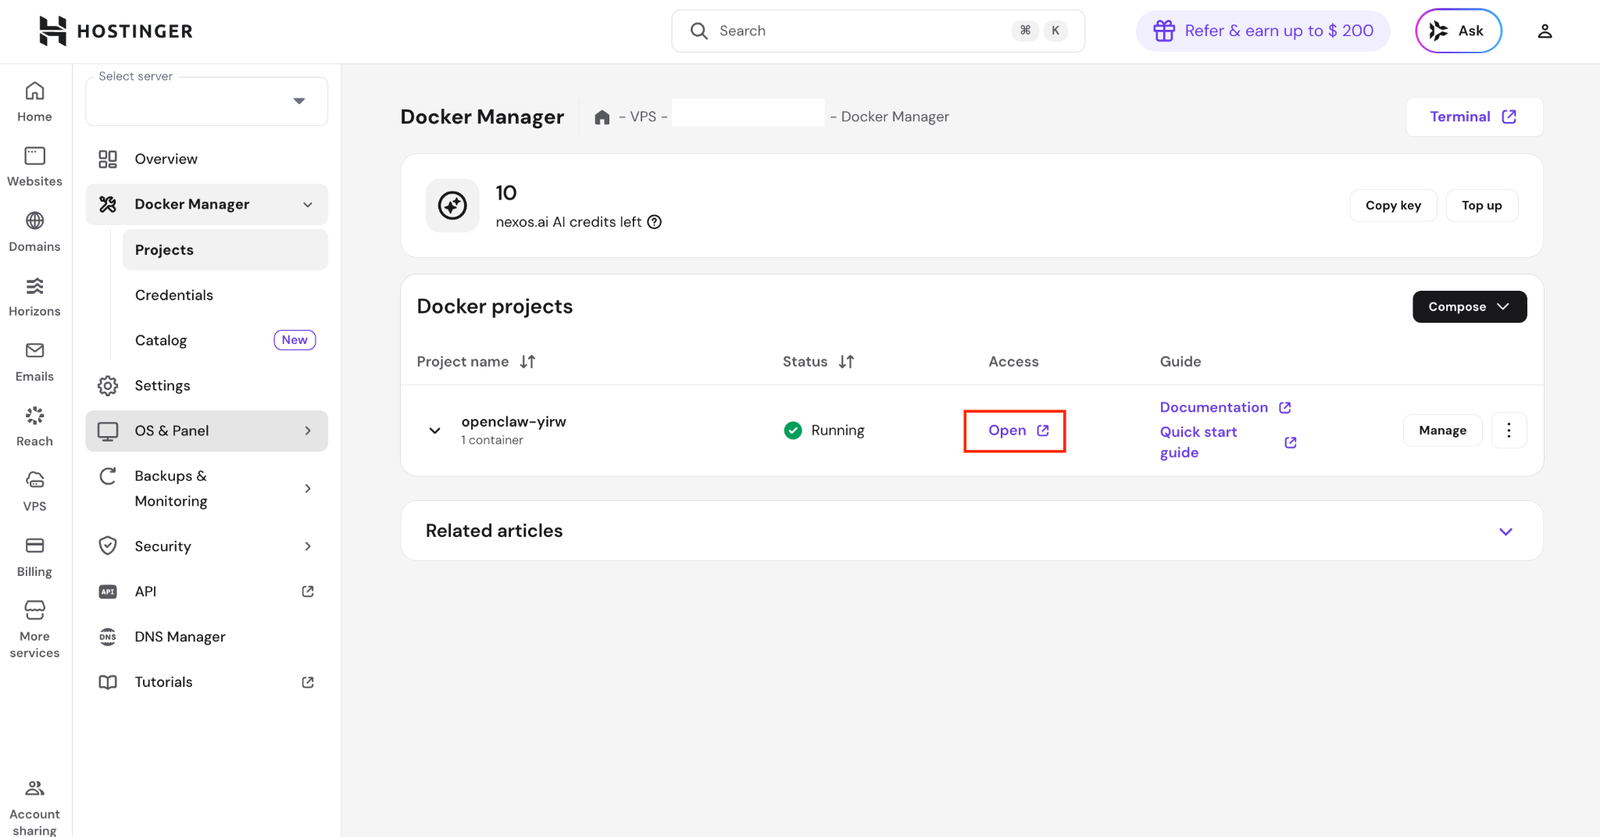
Access the OpenClaw Gateway dashboard by clicking the Open button. Then, enter the gateway token you got earlier to log in
If you want a more detailed walkthrough, follow our complete guide on how to set up OpenClaw, which covers manual Docker installation and configuration on any VPS provider
Next, you need to give OpenClaw the knowledge to work with WordPress. You can do this by installing agent skills, which are instruction sets that tell the AI how to perform specific tasks
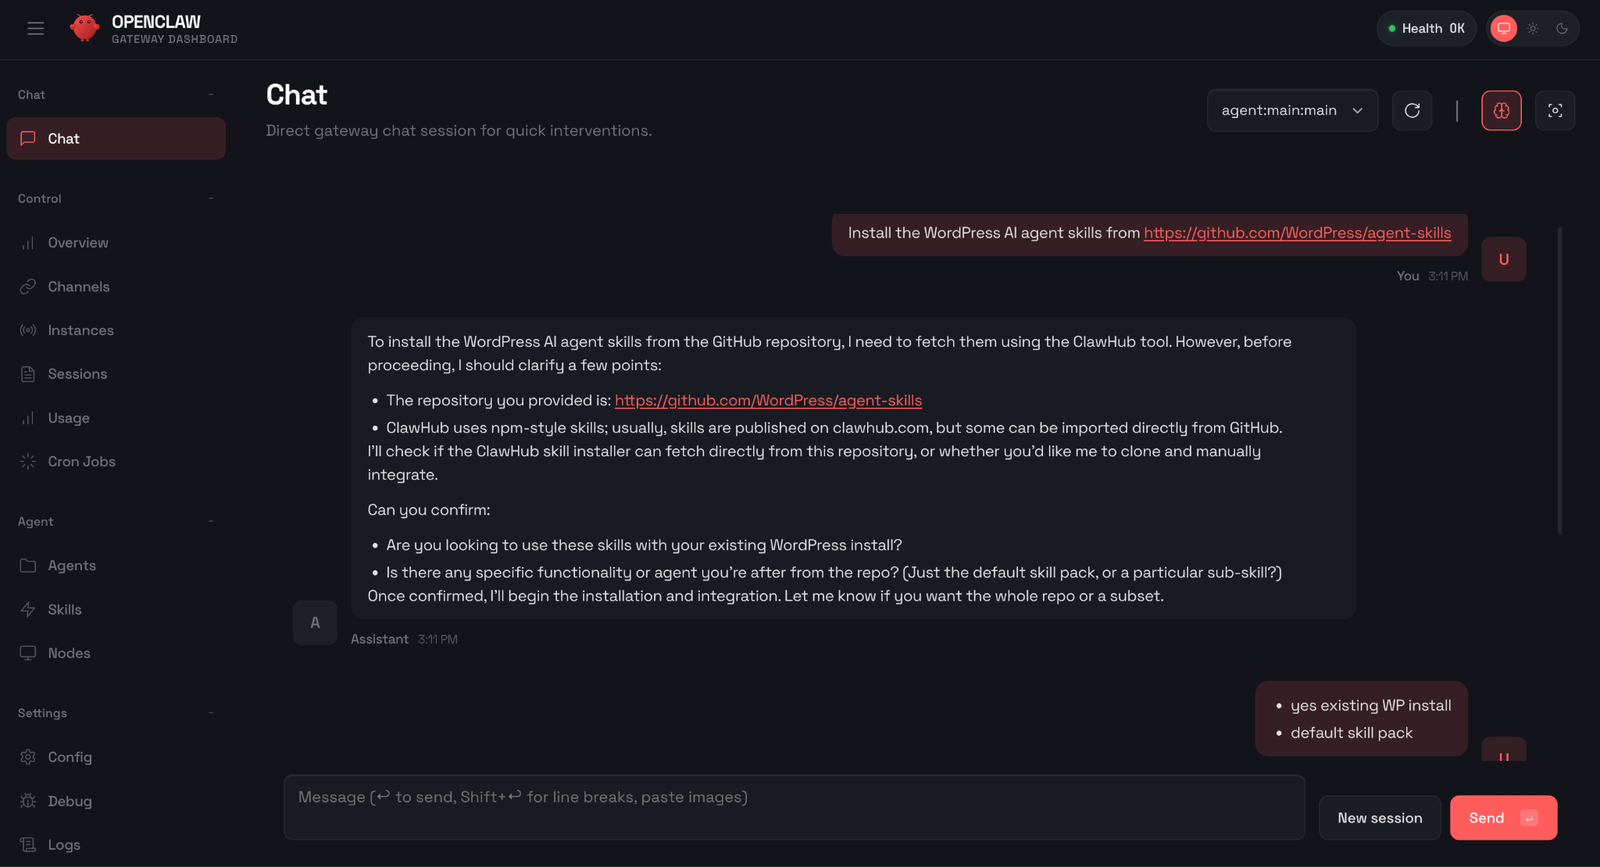
Within the OpenClaw dashboard, find the Chat window and type the following prompt:
Install the WordPress AI agent skills from https://github.com/WordPress/agent-skills
OpenClaw will handle the rest – cloning the repository, reading the skill files, and making them available for use
Now it’s time to connect your WordPress site to OpenClaw. It will ask for your username and password. But you can instruct OpenClaw to connect with the WordPress Application Password, so you don’t have to disclose your WordPress admin password
Generate your WordPress Application Password by following these steps:
- Log in to your WordPress admin dashboard.
- If you have the Hostinger Tools plugin installed, go to Hostinger→ Tools. Enabletheapplication passwordstoggle. Otherwise, application passwords are typically enabled by default in WordPress 5.6+.
- Navigate to Users → Profile. Find the Username field and copy your username somewhere.
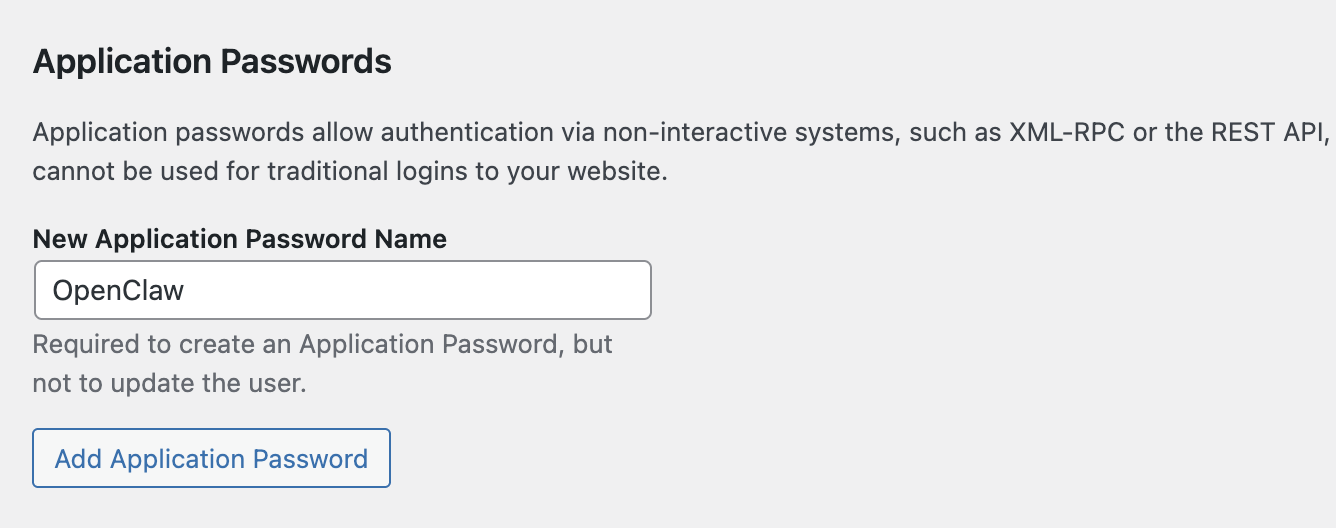
- Scroll down to the Application Passwords section.
- Enter a name for the application. Something like “OpenClaw” works great, and click Add Application Password.
- WordPress will generate an application password. Copy it and store it somewhere safe since you won’t be able to see it again.
Now, go back to your OpenClaw dashboard. Enter this prompt in the chat interface:
Connect to my WordPress site [enter your website URL]
After it gets back to you, confirm how you prefer the authentication process with this prompt:
Let's authenticate via REST API and application passwords
OpenClaw will guide you through the configuration process, and it’ll ask you to provide your WordPress username and Application Password. Simply enter them in the chat, and OpenClaw will establish the connection
If you don’t have a WordPress site yet, you can get started quickly using Hostinger’s managed hosting for WordPress. It comes with WordPress pre-installed, automatic updates, and a user-friendly dashboard that makes it easy to manage your site alongside your OpenClaw setup
Once the configuration is successful, try instructing OpenClaw to act on your WordPress site. For instance, you can ask it to create posts, update pages, manage media, and more
You simply need to write prompts like you’re telling a personal assistant to do something, like:
Write a post for my WordPress site about the history of WordPress
OpenClaw will process your request, draft the post content, and publish it directly to your WordPress site through the REST API. You’ll see the agent working through the steps in the chat, generating the content, formatting it, and pushing it live
Once the command finishes executing, head over to your website’s front end and check the published post. You should see it live, formatted, and ready for your visitors to read
This is just one example. You can experiment with more complex commands, such as updating existing posts, managing categories and tags, creating pages, optimizing content for SEO, or even scheduling posts for future publishing
The more you interact with your OpenClaw agent, the more you’ll discover what it can handle for you
OpenClaw can execute virtually any WordPress task that’s available through the REST API, which covers the majority of the core admin operations. That includes managing posts, pages, comments, users, media, categories, tags, plugins, and themes remotely, without opening the WordPress dashboard
With the WordPress skill installed, you can prompt OpenClaw in natural language through your preferred messaging channel. If you’ve connected a messaging app like WhatsApp or Telegram, you can even send instructions directly from those chat windows – no need to open the OpenClaw dashboard
Just type what you need as if you’re messaging a friend, and OpenClaw will translate your request into the corresponding API calls
OpenClaw can retrieve, analyze, and update your existing WordPress posts through the REST API’s posts endpoint. This is useful when you want to refresh outdated content, improve readability, or update information across multiple articles
To update a specific post, give OpenClaw clear instructions about what to change and how. Here’s an example prompt for refreshing an article:
Retrieve the post titled "Best Budget Laptops for 2025" from my WordPress site. Update the title year to 2026. In the body, replace any discontinued laptop models with their current successors. Keep the same structure and tone. Show me the changes before publishing.
OpenClaw fetches post content using its language model, and displays a before/after comparison. Once you approve, it sends a PUT request to save the changes
By requesting a preview before publishing, you maintain editorial control while saving time on manual work such as locating, editing, and republishing content
The WordPress REST API provides full access to comment management through the /wp-json/wp/v2/comments endpoint. This means OpenClaw can list, approve, reject, mark as spam, and delete WordPress comments on your behalf
Specifically, you can ask OpenClaw to:
- List pending comments.Retrieve all comments awaiting moderation, along with the post they belong to.
- Approve or reject comments.Update a comment’s status to approved or trash based on your criteria.
- Flag spam.Change a comment’s status to spam, removing it from public view.
- Delete comments. Permanently remove individual comments or clear them in bulk.
To moderate comments through OpenClaw, describe the action and any filtering criteria in your prompt:
Check my WordPress site for any pending comments. Show me a summary of each one, including the commenter's name, the post title, and a preview of the comment text. Approve comments that look legitimate, and mark any that contain links to external sites or promotional language as spam.
OpenClaw reviews each pending comment, evaluates it against your criteria, and applies the appropriate status changes
You can also handle routine cleanup. For example, ask OpenClaw to delete all spam comments older than 30 days or remove all unapproved comments from a specific post
The WordPress REST API’s /wp-json/wp/v2/users endpoint supports creating, updating, listing, and deleting user accounts. OpenClaw can handle all of these operations from a single conversation
Through the API, you can ask OpenClaw to:
- Create new users with a specific role, such as Editor, Author, or Subscriber.
- Update existing user details like display names, email addresses, orWordPress usernames.
- Change user roles, such as promoting a Contributor to an Author.
- List all users filtered by role, which is handy for auditing who has access to your site.
- Delete user accounts and reassign their content to another user.
Here’s a prompt example to create a new user through OpenClaw:
Create a new user on my WordPress site with the following details:- Username: jdoe- Email: jdoe@example.com- Role: Editor- Display name: Jane DoeSend me a confirmation once it's done.
OpenClaw sends a POST request to the user’s endpoint with the provided details and returns a confirmation with the new user’s ID
For sites with multiple contributors, understandingWordPress user roles will help you assign the right level of access. And if you ever need to migrate or back up your user list, you can also ask OpenClaw to retrieve all users and format the data as a CSV, or check out our guide on how toexport WordPress users
The WordPress automation examples above only scratch the surface. OpenClaw has a much wider range of potential uses, extending well beyond your WordPress site
For example, you can set it up to send a two-minute morning briefing each day that includes the weather forecast, your calendar events, and top news headlines, delivered directly to your phone
It’s also a capable tool for content workflows: you can prompt OpenClaw to brainstorm content ideas based on your niche, generate a first draft from an outline, or repurpose a blog post into social media copy for multiple platforms
On the DevOps side, OpenClaw can monitor your server health in the background and send you alerts when issues arise, such as high CPU usage or a failed deployment
These are just a few examples. Explore moreways to automate tasks using OpenClaw to find workflows that fit your setup
All of the tutorial content on this website is subject to
Hostinger’s rigorous editorial standards and values
Related:
Digital Automation Training Benin: 5 Winning Skills Employers Demand in 2026
WhatsApp Marketing Automation Africa: 6 Dangerous Mistakes Brands Make in Nigeria
Want to learn this practically?
Join Justfine Infotech and build real digital skills in AI, automation, web development, digital marketing, office productivity, e-commerce, freelancing and cybersecurity.
Available Programmes:
6 Weeks Certificate • 3 Months Professional Certificate • 6 Months Diploma • Full Professional Diploma
WhatsApp:
+229 01 57 57 99 15
+229 01 66 68 11 60
Source: www.hostinger.com

 English (UK)
  Français